What To Do With Your Greeting Cards – Do You Toss, Keep, Store Or Dispose Of Them?

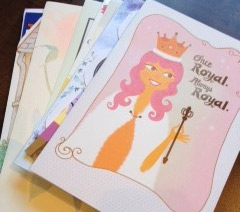
Several of the homes I am working in right now seem to have an over abundance of greeting cards. These are cards the family members have received over the years. One of the questions I get asked frequently is “should I keep these cards? I will get to that in a minute. In the mean time I find it interesting that most of these greeting cards are in an old box, they are bent and sometimes still in the envelope….unopened! Boxes of cards can get very dusty and musty smelling too.

Do you have boxes of greeting cards that you have received?

What is your purpose of keeping them?

Read on to get the TOP 5 Getting It Together’s TIPs on What to do with your greeting cards.

Tip#1 Decide if you are an Ecard person or a paper card person. Pick one method and stick to it. Some people are NO card people. Maybe as a family they have decided to not send any cards. (You might decide to put the money you would spend on cards and donate it to a charity of your choice) Then there is the “send out card” company. They do all the work for you once you have given them all your details.

Tip#2: Purpose. What is the purpose of keeping a card? If you give someone a card do you expect them to keep it FOREVER? Probably not. Just like if someone gives you a card they do not expect you to keep it forever. I heard of a lady who kept every card she had ever received. Her thought was that she would re-read them all one day when she was in an “old folks” home. She thought she would like to remember all the kind things people had said to her. I visit an extended care home once a week and I hate to say it but there is no room in those places for a lifetime supply of greeting cards.

Tip#3: Keep the very special ones. So you decide that yes indeed you would like to keep the very special cards. After each Birthday, Anniversary, festive holiday season sit down with a cup of tea.

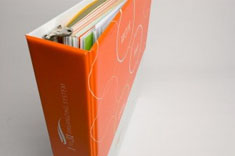
Look over all your cards and select your 2-3 most precious ones. I put one or 2 of my most special greeting cards in random places in my www.1t031.com binder. That way when I open a page I get a warm fuzzy feeling from the person who sent me the card.

Tip#4: Store them properly. Once you have narrowed down your cards, store them in a plastic shoe box. Many hardware stores carry these boxes at a very reasonable price. Our local store just had them on for .67cents (Canadian) each. It would be fair to have one box per person in the household.

Tip#5: Recycle, repurpose. Please be sure to recycle all greeting cards you are not keeping or repurpose them. One way is to turn your old greeting cards into gift tags. Cut out part of the pretty picture, punch a hole in the upper corner and put a ribbon through it. Check in with your local school or senior centre’s to see if they would like cards for craft projects. I knew one lady who could take a greeting card and turn it into a box. She then put small candies or a piece of jewelry in it and gave them away.

Love to hear from you. What do you do with your greeting cards? Please leave a comment in the box below.

2

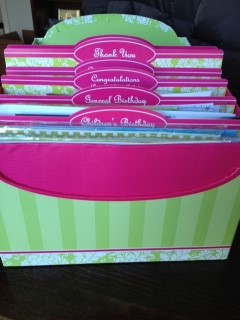
PS: This picture is of the system I use to store new greeting cards. This box has dividers in it for all of the special occasions. Once I buy my cards I simply file them under the appropriate occasion. I also use my perpetual calendar that is part of my 1to31 Organizing System. This helps me keep track of all my friends and families Birthdays, anniversaries and special occasions. Check it out www.1to31.com

By |2020-06-07T20:52:36+00:00August 11th, 2015|Home Organization, Organizer, Organizing to Move|0 Comments

How To Get Financially Organized – Part 2

Hopefully by now you have your systems in place. Did you decide to go paperless or are you feeling more comfortable with a small file cabinet?Tab03b Did you check out the fees at your bank? If you received the 1to31 organizing system how are you doing with it? Do you need a quick consultation on how to get the most from it? If so please contact me and I will walk you through it. In the mean time, check out this short video on

How
To Get Financially Organized

– part 2

and then read Getting It Together’s Top 5 Tips Tip #1: Automatic savings. Set up an automatic savings deposit every month. Look at your finances and decide what amount can go to your savings accounting. If it is done automatically you will not miss it. Even small amounts add up. Check out the documentary “livingononedollar” if you do not believe me. I save all of my change and add it to this account. Those loonies and toonies add up for those of us living in Canada. I see the States have a one dollar coin now too. Welcome to our world America. Tip #2: Make a monthly date with yourself. Once a month take the time to look over your financial situation. Review your bank statements and files in your file cabinet if you are not paperless. If you receive everything online set up files on your computer using the same file names in tip 1 from part 1 of

How To Get Financially Organized
 

. Also each month reconcile your spending, your cheque book and your budget. Tip #3: Have a financial goal. Whether you are just starting out in your first job or are established in your career it is important to have a financial goal. How much do you want to save each year? How much do you want to donate if anything? Take a good hard look at all of your expenses and come up with a plan. If you find this overwhelming give me a call and I will help you organize all of this. This tip alone will be very empowering if done correctly even if you do not make the kind of money you would like to be making at this moment in time. Tip #4: Clear out the old. Once a year clear out all of your old bills, investment statements and any other papers that happen to make their way into your files. That can happenJ Tip #5: Talk. It is important to talk to your kids early on in life about money and finances. Get them to set up a short term and long term savings account. Talk to your partner about your financial goals. Do you have the same values around money, saving and spending? P.S.>> Click here to listen to my Guest spot on BlogTalkRadio. It was so much fun! A great short story to end with. Shared by one of my readers. Thank you The Magic Bank Account Imagine that you had won the following *PRIZE* in a contest: Each morning your bank would deposit $86,400 in your private account for your use.  However, this prize has rules: The set of rules: 1. Everything that you didn’t spend during each day would be taken away from you. 2. You may not simply transfer money into some other account. 3. You may only spend it. 4. Each morning upon awakening, the bank opens your account with another $86,400 for that day. 5. The bank can end the game without warning; at any time it can say, “Game Over!”. It can close the account and you will not receive a new one. What would you personally do? You would buy anything and everything you wanted right? Not only for yourself, but for all the people you love and care for. Even for people you don’t know, because you couldn’t possibly spend it all on yourself, right? You would try to spend every penny, and use it all, because you knew it would be replenished in the morning, right? ACTUALLY, This GAME is REAL … Shocked??? YES! Each of us is already a winner of this *PRIZE*. We just can’t seem to see it. The PRIZE is *TIME*

  1. Each morning we awaken to receive 86,400 seconds as a gift of life.
  2. And when we go to sleep at night, any remaining time is not credited to us.
  3. What we haven’t used up that day is forever lost.
  4. Yesterday is forever gone
  5. Each morning the account is refilled, but the bank can dissolve your account at any time WITHOUT WARNING…

SO, what will YOU do with your 86,400 seconds? Those seconds are worth so much more than the same amount in dollars.  Think about it and remember to enjoy every second of your life, because time races by so much quicker than you think. So take care of yourself, be happy, love deeply and enjoy life! Here’s wishing you a wonderful and beautiful day. Start “spending”….

DON’T COMPLAIN ABOUT GROWING OLD…!

SOME PEOPLE DON’T GET THE PRIVILEGE!


How To Get Financially Organized Part 1

Do you panic when it comes to tax time?

Do you dream of having all of your important papers ready at any given moment for the bank?

Like when you are going for a loan or mortgage.

If your house was on fire what would you grab?

The interesting thing is almost everyone interviewed says their photos. No one ever says their important documents. In fact both are very hard to replace if not almost impossible.

Why not set up a system that is easy to grab? Yes for the most part things will be on your computer however I have found that people still like to have a paper trail. I think it is because we feel more in control if we have that important document in our hands and then we can file it. We can see it at a quick glance and more importantly we can touch it. What do you think? Please leave it in the comment box below.

We are still not a paperless society. There are certain things that we need handy in paper format like a power of attorney or a will.

In order to get financially fit I would suggest watching this quick video (Part One) and then follow these simple Getting It Together’s Top 5 tips on how to get financially organized.

Tip #1: Set up a small and I mean small file cabinet or portable file box. The reason you want to keep it small is so you will toss out the outdated information as the new information comes in.

Create File Folders for:

  • Savings Account
  • Chequing account
  • Credit Card accounts (I suggest having two credit cards especially if you travel)
  • Retirement accounts
  • Mortgage
  • Investment accounts
  • Insurance: life, critical illness, disability, home and car
  • Loans
  • Will and power of attorney
  • Tax return from past yr and current yr.
  • Miscellaneous

I personally have all these important documents in a binder. My executor knows exactly where it is and what is in it. 1to31-4663 medThis will make her job easier when the time comes for her to deal with my affairs. Being this organized with your important papers is a gift you give to the people who are left to deal with your affairs. There is nothing worse than trying to find all the important papers while grieving.

Tip #2: Set up online banking and telephone banking. Like it or not sooner than later we will have to do 90% of our banking online and why not? It is a great way to save time. You can do all of your banking while the kids sleep or on your coffee break at work.

Tip #3: Set up automatic bill payments. The best thing I ever did to get financially organized was setting up all of my bills to be pre-authorized to go on my visa. Then once a month my Visa gets paid automatically from my account. Yes it is important to check your credit card statement to make sure that all of the purchases are yours. You can do that online before it gets paid. If you set up this system it is important to pay your credit card off in full each month. The last thing you want is to be paying interest on your phone bill etc. The best part is you get extra travel miles if you collect those.

If you are not comfortable with automatic bill payments then set yourself up a little area in your home where you pay bills. Is it in the kitchen or do you have a small office area? Make sure you have the supplies required.

  • Stamps
  • Envelopes
  • Pens
  • Paper
  • Return address labels
  • Shredder
  • Recycle bin.

Once the bill is paid file it until the next months bill comes in at which point you can shred the last months bill. There is no need to keep a life time of phone bills. Even if you are in business for yourself you only have to keep 7 years worth. All major companies keep a record of our bills should you ever need an old statement.

Tip #4: Reduce banking fees. Check with your bank to see how you can reduce monthly banking fees. If I keep a balance of $1000.00 or more in my account I avoid all fees. If you are a senior you might be able to avoid fees. Each bank has different policies. Shop around to get the best deal for you.

Tip #5: Use your 1to31 system. Don’t have one yet? Check it out at www.1to31.com

If you are still getting paper bills file them under the date in which they need to be paid. The 1to31 is the best place to keep track of them.

By |2020-06-07T20:52:38+00:00April 14th, 2015|Organizer, Organizing Finances, Tax Organization|0 Comments

How To Have A Stress Free Vacation – Part 2

Whistler

Whistler, BC

After reading part one of how to have a stress free vacation I am sure you are anxious to get going with part 2.

Are your bags packed?

Do you know where your passport is? It is up to date?

Because I love to travel I like to be ready at any given moment to be able to take off. You just never know when you will get the call….hey I have a spare ticket to Bali, want to come? Ok, I am dreaming of this call.

In the mean time check out Getting It Together’s Top 5 simple tips on how to have a stress free vacation so you’ll be ready to go at the drop of a hat too. Please share the love by sharing the link to this video and blog post.

Tip #1: Have a travel bin. Keep your passport, airplane headsets, detailed packing list, left over foreign currency, travel size toiletries, travel meds like gravel, bear bell if you are biking in Whistler BC Canada, travel jewelry roll up, travel pillow and blanket for the plane, portable travel scale to make sure your suitcase is not over weight, plug adapters, and travel books/maps and brochures of places you have been to and will return to or places you would like to go to.

Can you think of anything else?
If so, please leave your comments in the box below.

Tip #2: Travel medicine bag. Have one ready to go at all times. Carry things like band aids, pollysporin, tea tree oil, and peppermint oil for rejuvenation after a long flight, vitamin c so you can nip a cold in the bud, headache relief pills, and any allergy medication you might need.

Tip #3suitcases: Plan your return. Avoid the stress of rushing back to work by coming home from your vacation one or two days before you need to return back to work. Nothing makes a person lose vacation mode more than by running in the door late on a Sunday night and having to be in the office first thing Monday morning. Not to mention you will have nothing in your fridge unless you have a magic elf filling it for you.

Tip #4: Catch – up day. Use that first day back home to catch up on laundry, returning phone calls, opening and dealing with mail and emails. Get back into the groove slowly. Savor the vacation mindset. Look at your photos and savor the memories.

Do you have the luxury of having a catch up day at work? That first day back after vacation can seem overwhelming. Look at your tasks and bite them down into manageable to do’s. The last thing you want is to be exhausted after your first day back to work when returning from a fun filled vacation.

Tip #5: Look at your bucket list. We can all be prone to vacation let down. Back to reality, work, and life in general. So why not look at your bucket list and start thinking about your next vacation.

Where is your most favorite travel destination? Please leave it in the comment box below.

In the mean time if you have not taken advantage of your FREE 30 minute call why not do that today? We could do a little vacation dreaming and come up with a plan of action for you.

Simply go to www.reclaimsession.com to book your time now.


By |2020-06-07T20:52:39+00:00March 17th, 2015|Organizer, Time Management, Travel Organization|0 Comments

Organizing your make-up: Find what you are looking for in 20 seconds or less

R applying Makeup-5
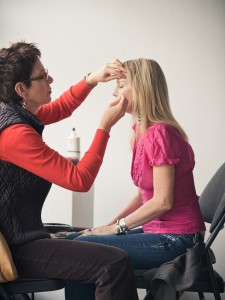
Most of you know I come from a cosmetic background. With well over 3 decades in the business I thought it was time to share a few of my trade secrets. Like most of us, putting on our make-up is a habit. One day rolls into the next and before long we realize we have not cleared out or organized our make-up for some time. This is not a good thing.

Here are a few of my top tips for organizing your make-up. You’ll be able to find what you are looking for in 20 seconds or less and be up to date.

Tip#1 Pump bottles. Whenever possible use cleansers, moisturizers and foundations that come in pump bottles. This saves time. No more opening the containers morning and night. Simply pump out what you need. It is also more sanitary as your fingers are not touching the open caps.

Tip#2 Brushes. One good set of brushes is all a gal needs. My favorite is the MaryKay brush set because it comes in a nice roll –up container. This is especially handy when traveling. Good brush sets will last many years. Wash them once a month in a little shampoo and conditioner. Allow to dry overnight. Toss out all old, used sponge tip applicators and broken brushes.

Tip#3 Colour cosmetics. This includes eye shadows, liners, lipsticks and blush. Dump out your cosmetic bag, drawer or basket. Know your limit. How many items do you really want and need? It is safe to say that 3-4 eye colours will cover your basic needs. Toss the ones you never use and ALL purchasing mistakes. Come on, we all have one or two of those in our bag. The shimmery gold eye colour that you thought you HAD to have. Toss ALL lipsticks you are no longer wearing. The ones with just a little left in the tube, the FREE ones that are not your colour and the outdated ones. Keep your favorite 3-4. Do the same with your liners and blush. The thing is we wear 20% of our make-up 80% of the time.

Tip#4 Storage. Pick one place to store your make-up. Do you like to keep it all in a cosmetic bag, a basket or a drawer? The more places you have to store cosmetics the more likely you will spread to those areas. This is not a good thing. I keep all my items in one small drawer in the bathroom. I also like to have a travel cosmetic bag ready to go at all times. I put all my “almost finished” eye colours, blush and liners in there.

Tip#5 Toss. How many bottles of half used creams, lotions and potions do you have? Do you go onto the new before using up the old? People have the best of intentions of using up those partially used bottles. They don’t. Do yourself an organizing favour and toss them out. OR promise me you will use them up before buying new.

Do you have lots of unopened make-up items, cosmetics or toiletries? Please donate them to your local women’s shelter. They would be happy to receive them.

Keep your “look” up to date with regular consultations. Many cosmetic counters offer this service. So do home based cosmetic companies. Find a consultant who knows your style and one that you trust.

I love organizing cosmetic drawers, bags or baskets. Be sure to contact for a FREE 30 minute phone consultation. We will discuss your make-up needs; your storage concerns and solutions. I’ll even give you the latest make-up trends.

By |2020-06-07T20:52:39+00:00January 26th, 2015|Organizer|0 Comments

How to Organize a Computer

Can you believe that most people waste 76 hours per year-nearly two weeks’ worth of work, looking for things on their computer or in their office?

Do you have a love hate relationship with your computer?

Do you wish your computer was more organized?

Check out this short video on How to Organize a Computer.

Read on for my simple top 5 tips on how to organize a computer so you do not toss it out the window.

Tip#1: Back up your computer. Can you believe that 30% of people do not back up their files and every 3 seconds someone’s hard drive fails. YIKES! You can get an external drive, or rely on the “cloud”. (It is a virtual backup on a website that uses multiple servers.) Even on a sunny day here in Vancouver would you feel comfortable relying on a cloud? What if the cloud crashes? I still feel that the most important papers in your life need to be backed-up on your computer and you also need a hard copy.

Tip#2: Empty your recycling bin or trash. Have you kept EVERY single solitary email, file, document, etc. that you have ever received on your computer? You could be headed for a crash and burn situation. Just like you take out your paper recycling each week, you need to do the same with your computer. Clean it up. Take 15 minutes each week and delete what you no longer need. Exit out of all programs you are using; don’t just minimize them, then empty the trash.

Tip#3: Organize your desktop. Don’t save unneeded files. It slows your computer down. I’ve seen desktops that have so many files on them you can hardly see the screen. This is clutter to the mind just looking at it. Take a second to put these files in a hard-drive folder like “My Documents” or “My Photos”. Before you move any files, ask yourself  “do I need this information any longer or can I toss it?”

For example you might have thought it was cool to have “Google Earth” on your desktop. How often do you look at it? Is it necessary to keep it?

Tip#4: Re-boot. “Booting up” a computer was so termed because programs load in sequence, the first pulls the rest up by their bootstraps. It’s fine to let a computer “sleep” rather than shut it done, but reboot weekly to really refresh it. I recommend turning your computer off at the end of each day. This will save on electricity which saves on our environment. Reduce your webpage history. Your browser stores visited sites automatically. Set the history to clear every week.

Tip#5: Keep it clean. How often do you wipe down your keyboard, your mouse, your screen? I cannot even imagine the germs that are on and around our computers. We touch them with dirty fingers, we sneeze around them and not to mention crumbs from our morning toast. You can get all kinds of fancy computer cleaning kits. I personally use a Q-tip and microfiber cloth for keyboard and screen and an alcohol wipe for the mouse.

You know there is so much more we can talk about when it comes to our computers, organizing emails, etc. I’ll save those tips for another post. In the meantime please feel free to contact me for your FREE 30 minute reclaim session. We can discuss your burning computer questions, how to organize them, and how to move forward. Contact www.reclaimsession.com to book your time now.

If I cannot answer your questions you might have to join me for lunch with my really smart girlfriend! Lucky for me I can call on my girlfriend to help me out with most computer issues. She is not a computer person by trade, however she is really smart. She is actually a professional photographer. A world class one I might add.

By |2020-06-07T20:52:39+00:00December 29th, 2014|Organizer, Time Management|0 Comments

How To Organize Kids Artwork – what to keep and how to store the rest

Kids artwork
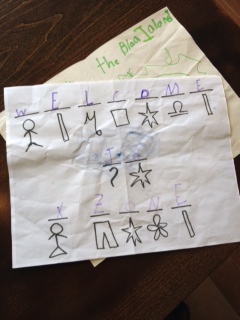
Do you have the next up and coming Picasso?

Do you wish you could keep every piece of artwork your kids bring home?

Do you keep all the art thinking that your kids will want it when they are grown up?

Human nature is such that we all think pretty much the same on this topic. We feel that every piece of artwork is the BEST piece. We feel that we want to keep all the kids artwork because it would hurt their feelings if they saw it in the recycle bin. We also think they will want it when they are grown up … is this so they can show their own kids? Do you have your artwork from your childhood? What are you doing with it? How many times have you moved it? Is it filled with dust and must?

I do not know about you, but I do not have one piece of artwork from my childhood. I am perfectly okay with that as I see other children’s artwork and know that mine would have looked almost identical. Plus, what would I do with 10 plus year old artwork? I really do not feel any less than by not having my artwork.

I do have a vivid memory of a piece of artwork that I did that won me $5.00. It was of a dragon. It was big and bright and colourful. The memory is all I need.

Take a quick moment to watch this video on How to Organize Kids Artwork:


Then give these simple 5 tips a try on how to organize your kid’s artwork.

Tip#1: Designate one wall or hallway for your kid’s artwork. Hang a long piece of string on that wall that looks like a clothes line but attached to the wall. Hang clothes pins from the string.

Tip#2: Each time your child brings home a piece of artwork hang it from the “clothesline”.

Tip#3: At the end of each week take a photo of your child standing beside his/her artwork. These pictures make really cool screensaver slideshows or a Pinterest board!

Tip#4: At the end of each week take all the art down off the string. Along with your child (or not) decide on ONE piece of art from that week that you will keep. The rest can be recycled, used as wrapping paper for the next Birthday party, made into greeting cards for family and friends, or turned into party invitations. You can even send the artwork off to grandparents or aunts and uncles.

Tip#5: At the end of each month you will have 4 pieces of your children’s finest Picasso. Along with them or by yourself select ONE of your favorite to store in a keepsake box. The other 3 get tossed, or repurposed as mentioned in tip #4. At the end of the year you will have 12 pieces of art. Now it is time to get ruthless again and select ONE piece that will be saved in your child’s memorabilia box or you may choose to frame this one piece or you may choose to put it in a bound book. You can also add the weekly photos that you took to this book or scrapbook. I have seen really cool bound books of kid’s artwork. If you are interested in this please contact me and I will give you the contact information.

I would love to see your children’s artwork. Please send me a picture or two. Also, I would love to hear your comments. Please fill in the box below with your great ideas on organizing your kid’s artwork or any questions you might have.

Have you set up a Pinterest account? If not please feel free to contact me. I’ll give you the highs and lows in a FREE 30 minute phone consultation. We will discuss whether you need a Pinterest account. What you can pin and why you might like to have a Pinterest account.

By |2020-06-07T20:52:40+00:00December 15th, 2014|Home Organization, Organizer|2 Comments

Downsizing Seniors

Downsizing SeniorsAre you the adult child of an aging senior?

Are your parents still in the family home? Is it time to downsize them?

Are you a senior wanting to downsize?

Seniors are our largest growing demographic. You may be one of them or you may have parents that fit into that category.

My mom is 79. Fortunately she is still able to live in the family home however that does not mean that is the best idea. Some experts have the theory that it is better to downsize while you can still make all of the major decisions and your health is still really good. I would have to agree.

All too often I work with clients who are not capable of downsizing. Their grown children are so busy with their own lives that they are not able to help either.

Check out this short video on downsizing seniors. Plus Getting it Together’s game plan.

1. Have a family meeting to decide when a good time to start downsizing is. My Aunt did this and came up with the age in which she felt was appropriate to move into something smaller. She has given herself a couple of years in which to plan for and execute the move. In the meantime when her grown children are over they work on a certain area of the house. For example, they did cookbooks the other day. This was a funny one because my cousin asked my Aunt which cookbooks she was still using to which my Aunt replied “none, I do not cook anymore”. Lol

Ok so that was easy. All the cookbooks went to the second hand book store.

Next in line were the volumes of encyclopedias. The money people have spent on encyclopedias to realize that now a day’s Google does it all for us. Off to the used book store they went.

2. Decide who will help you or your aging parents with downsizing. Chances are your grown kids have a young family of their own. Their time may be very limited. Is it best to hire a professional organizer to help with the downsizing?

3. Where do you want your items to go? This is always a tricky question. I know of people that again have a family meeting. They get each person to put their name on the back of any items they would like once the downsizing starts and/or when the aging parents pass away. Are there collections that need to be sold? Are there family heirlooms that need to be preserved? Are there other household items that need to be donated or tossed? This is where I come in. I will sell, donate, or toss items for my clients. I think if people know their items are going to a good place they are more likely to part with them.

What items will be needed in the new smaller living space? This might be a tougher question to answer until you see the new smaller living space. Once you do, you will be able to decide what stays and what goes.

4. When should you start downsizing? TODAY! If you have allowed yourself enough time you can break this downsizing project down into bite size pieces. Try not to leave this project to the last minute. Change is hard on most people. Downsizing is one of the biggest changes a person might do in their life. Embrace it.

Would you like a FREE session over the phone? Contact me today to get yours. We can discuss your downsizing situation and come up with some solutions in order for you to move forward right away.

Have you had any experience with downsizing a parent or have you yourself recently downsized? If so please leave some helpful comments in the box below.


How To Organize A Wallet

OLYMPUS DIGITAL CAMERA 
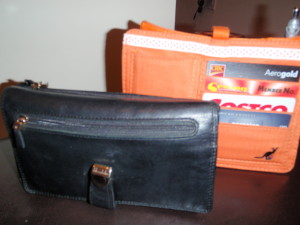
What can you tell about a person’s shape, size and condition of their wallet? There are wallets that look like filing cabinets, ones that look like there is nothing in them and then there are some wallets that are held together by an elastic band.

What does your wallet look like?

What does your wallet say about you?

What would happen if your wallet fell on the floor in a coffee shop?

I love what the great money guru Susie Orman says “the thinner the wallet the richer the woman”. Susie feels that if your wallet is thin you have a handle on what is inside of it.

Check out this short video on “how to organize a wallet” and watch your money grow.

Here are Getting It Together’s Top 5 Tips:

Tip#1 Toss. Go through your wallet and discard anything that doesn’t belong. ATM receipts, expired coupons or gift cards, frequent shopper cards for places you no longer shop, old shopping lists, etc. You want your wallet to hold important things like money. You do not want it to look like a filing cabinet. One big wind storm and every piece of paper goes flying. (Did you ever see that on Seinfeld?) If so please leave a comment in the comment box below. 🙂

Tip#2 Photocopy. Take your credit cards, drivers license, medical card, etc and copy the fronts of them, then turn them all over exactly in the same spot and copy the backs.  Usually the back of the card displays the phone number to report lost or stolen cards. If your wallet gets stolen or lost you will know exactly what was in there and will have all of the correct phone numbers handy to call and report them as missing.  Keep these copies in your online files and in your safety deposit box.

Tip#3 Organize. Sort your wallet contents by type: Susie would agree with having all your money facing the same direction. Have your bills starting from smallest to largest. Organize identification, credit cards, medical cards, shopping/membership/gift cards, etc.  Use the sections of your wallet to keep these categories separated so you can find your cards quickly. Since writing cheques is not that common, only carry one cheque with you at any given time.

Tip#4 Condense. Do you have kids? Do you carry ALL of their medical cards with you? No need to. Take a blank business card. Write all the medical numbers on the card. Place it in your wallet. If you have 4 kids, that just saved on space and weight. Store the original medical cards in your files.

Tip#5 Clear out. Once a week take a minute or two to clear out all the unwanted papers and receipts from your wallet. Take the excess change and put it in your piggy bank, laundry money or parking meter money. I keep a small change purse in my car for parking. All that change can really weigh your wallet down.

Black Pouch, Purse - GIT
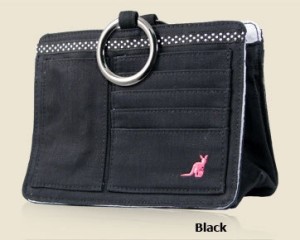
Want to be wallet-less? Put the contents of your wallet in my favorite purse organizer. The Pouchee purse organizer. There is a place for your credit cards, money, lipstick, eye glasses and receipts. It makes changing purses fast and easy. Check it out HERE.

Do you have any other tips for keeping your wallet organized? If so, share below!


By |2020-06-07T20:52:40+00:00October 20th, 2014|Organizer|4 Comments

Organizing Family Photos

Organizing family photos does not have to be an arduous task as long as you ask yourself these key questions.

What is your ultimate goal with organizing family photos?

Who would like to inherit all your family photos?

Would you like a family photo album for each family member or just one communal album?

Have you asked your family members if they would like a family photo album or is this something that you think they would like?

Do you make a hard copy or do you put each family member’s photos on a disk?

Do you organize your album by event or chronological?

Please ask yourself these questions and get clear on your outcome before starting the project.

The reason why I am getting you to really analyze these questions is because putting together family photo albums can be tricky. The upside is it can also be loads of fun and very rewarding.

I am going to assume you want to put together a family photo album for each family member. I’ll also assume that your pictures are in hard copy format not digital.

Check out this short video on Organizing Family Photos:

Use these top 5 Getting It Together tips to move forward with organizing family photos.

Let’s say you have 2 children. One we will call Tim and the other Sue.

Tip#1: Take a big white envelope and label it TIM. Take another big white envelope and label it SUE.

Tip#2: Take one small pile, small box or one old photo album. Divide the pictures between each big white envelope. Do not worry about anything else at this point. Just the sorting and dividing of prints between the 2 envelopes. If both children are in one picture you could scan it and put the photo in each envelope.

Tip#3: Take each envelope and do a ruthless purge. Toss any photos that are out of focus. Toss any where the eyes are closed or beat red. Toss any photos in which you have no memory of taking it, do not know where it was taken and or do not know who else is in the photos.

Tip#4: Next take your envelope of pictures and sort them by date or by events. For example you could put all birthday pictures together. Then all Christmas pictures together, etc. I find this to be far more effective than trying to do an album by date.

Tip#5: Put together the album. You may choose to write a little story on each page.

Once you have completed the 2 albums watch with delight as your grown children open them and devour the pages. I am sure they will be thrilled.

Still feeling a little overwhelmed by all the photos in your home. Call me for a FREE 30 minute phone consultation. We can discuss your personal needs. I’ll give you some tips and encouragement to help you move forward with this project.

Did this video and article help you with moving forward? If so, please leave a comment in the comment box below and please share the love by sharing this blog post with your family, friends and social media peeps. Thank you. 🙂

By |2020-06-07T20:52:41+00:00June 9th, 2014|Home Organization, Organizer, Time Management|0 Comments

Title

Go to Top