5 Tips to Organizing Your Photos

DisneylandWhen asked what you would grab if your house was on fire most people say “photos.” With this being the case, why is it that most people have photos all over their homes? In boxes, in the original developers envelopes, in piles, on a memory stick and in no order? Photos, photos and more photos.

Do you like to print all or some of the pictures you take?  Since going digital I only print the occasional photo. It is usually from a trip or some of the grandkids. In my past “film” life, I printed all my photos. They are all arranged in an “organized” fashion in photos albums. I bet you would have never guessed that! 😀

Everyone loves to take pictures. Pictures of their family, pictures of their travels and pictures in general. Are you one of those people?  Ever since I got a digital camera (over 3 years ago) I carry it with me everywhere. Digital cameras are so much fun. They are so easy to use and you can go snap-happy-crazy. That being said, once you have taken all those pictures I am sure you would like to learn the simple tips to organizing them. Well then read on!

Did you know that most people spend less than 7 minutes looking at their travel photos after a trip? Your friends and family spend even less time looking at them. Do you really need all of them in print?

Check out this helpful video on downsizing your photos:

Tip #1: Get ruthless.

Key question to ask yourself: “how many pictures do I need to tell the story?” The perfect example is walking down the aisle on your wedding day. Is it safe to say that one picture would tell that story? Cutting the cake, one or two would tell that story. Toss all of the photos that are duplicates, blurry, eyes closed or red-eyed. Especially toss the ones where you do not even know who is in the picture!

OLYMPUS DIGITAL CAMERATip#2: Categorize.

Do you like your photos by date (chronological order) or do you like them by events? Trip to Disneyland, wedding day, Christmas, etc. Whether you have hard copies of pictures or digital it is time to sort into categories. This is not a one day job, as I am sure you are like most people and have boxes and boxes of photos or files and files of electronic photos. Take 15 minutes a day and sort just a few photos into let’s say a travel category. Work on this project piece by piece.

Tip#3: Store.

Do you want to keep your printed photos in photo boxes or albums? Pick one way and stick to it. I have physical albums done by date and electronic albums done by event. This works best for me. Be sure to back up your electronic files.

Tip#4: Label.

Please be sure to put dates, names, events and any other interesting information on your photos. What is interesting is that I come across boxes of photos while working with  people with their organizing and there is not one piece of information about any of the photos. If your plan is to pass these photos onto your children, then make sure they know who everyone is.

Tip#5: System.

Starting from today, get a system in place for your photos. Any pictures you take from here on in will follow this new system. You can implement this new system while you are working on your photo organizing project.

Feeling a little overwhelmed with the volume of photos? I would love to support you in moving forward with organizing your photos and preserving all your fond memories for you and your families future. For a FREE consultation to discuss how we can move forward with this project, click here.

By |2020-06-07T20:52:42+00:00January 20th, 2014|Home Organization, Organizer|0 Comments

How to Organize a Home Office: Find What You Are Looking For in 20 Seconds or Less

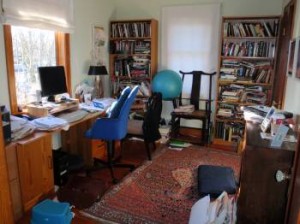
Disorganized officeAre you a solopreneur? Does your home office become a dumping ground for all the family projects, junk, and homeless items? Has your home office been neglected?

How many hours a day are you in your office? Do you share it with your kids?

How do you feel when you walk into your office? Do you close the door and go do laundry? This is probably not good for business.

A home office will naturally get disorganized from time to time however what is important is to be able to get it back in working order in 15 minutes or less.

Take a minute and think of 5 keywords you would use to describe your office. For example, you might want to describe it as inviting, relaxing, tidy, creative and organized. Keep these 5 keywords in mind when purging and organizing your office.

To find what you are looking for in 20 seconds or less, I am going to share my secret with you. Below are my 5 simple tips to having an organized workspace and keeping your sanity.

Tip #1 Clear the top of your desk

It is important to have a clear working surface. This also helps with keeping your mind clear. Start by clearing off the top of your desk except for your computer and phone. Put everything in a box (you’ll use this box later so keep it handy!). Wipe your desk down. Put one or two personal items on your desk. A family photo or a souvenir.

Tip #2 Have a working system in place

Do you share your office with other family members? Is your office a makeshift room in the house? Whether you have a small working space or large one it is important to have systems in place. Ask yourself these key questions.

Do you need:

  • An area for files?
  • A place to take care of family business like bill paying or kids school stuff.
  • A place for incoming phone messages and “to-do’s”? (I use www.1to31.com)
  • A working area that’s bigger? How big?
  • An area for being creative?

Now set up these different “areas or places” on the top of your desk or in a file cabinet. Before you file a piece of paper ask yourself this question “do I really need this paper or could I find it on the computer the next time I need it?” The key is to have “zones” in your office. A computer zone, a working space zone, a reading zone etc.

Tip # 3 Think outside of the box (LITERALLY!)

Go back to the box you used in Tip #1 and take out one item at a time. Put that item in its ‘new’ place. Keep in mind YOUR 5 keywords you have used to describe your office space. File items that need to be filed, toss items that are no longer needed and delegate anything you can. All non- office items need to be put away in their proper place within your home.

Tip # 4 Conquer email clutter

Was life better before email? Do you wish your inbox was cleared out by the end of the day?

Take 15 minutes to organize and purge your inbox. Set up folders for areas and subject matter you use most often. If you can, your email folders should correspond with the names of your paper files. This will save you time trying to find things later. Delete emails you no longer need. Unsubscribe from newsletters you no longer read. Be ruthless.

Check emails only once or twice a day if your business can handle this. Turn your email indicator off. The little bell is like a dog with a bone. It rings and you get distracted.

Tip # 5 Take 15 minutes at the end of your office time

Take 15 minutes at the end of each work day to clear off your desk, put things back and set-up for the next morning. Make this a habit. Even schedule it in your datebook if you have to. You’ll be so excited to get to work each morning knowing everything is in its place and that there is a place for everything.

Don’t let your office become a dumping ground for you or others. Keep those 5 keywords handy. Watch how much more productive you will be.

By |2020-06-07T20:52:42+00:00January 6th, 2014|Home Organization, Organizer|2 Comments

Title

Go to Top